Re: Blender Cycles + XnaLara Tutorials
Posted: Wed Aug 29, 2012 7:30 am
Welcome back for another lesson! 
Next up, let's learn how to mix shaders using the Mix Shader node. This is an essential part, you can freely create various shader effects on your render. But first, let's introduce ourselves to two of the basic and commonly used shader in Cycles, the Diffuse shader and Glossy shader.
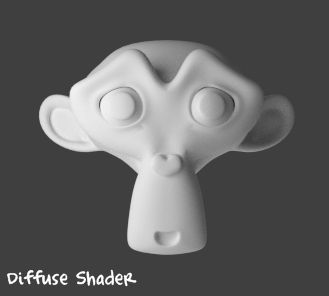
The diffuse shader is the base clay material shader in Cycles.
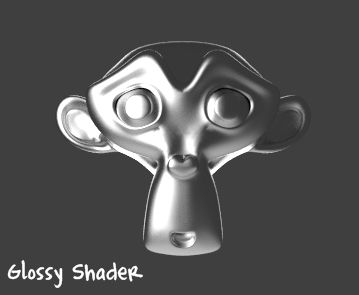
The Glossy shader is, well...Glossy (i have no other way to put it lol) it's shiny and reflective, just like alloy or silver, or that Terminator 2 cop guy when he melts into that thing and stuff.
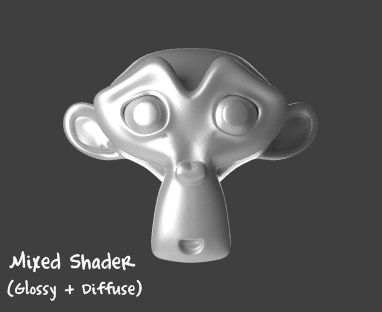
And here is the Mixed shader, as a result of mixing both Diffuse and Glossy! It looks like shiny plastic, or oily material. Notice that it retains the shininess of the Glossy shader, but at the same time it doesn't have reflection of its surroundings like the Diffuse shader.
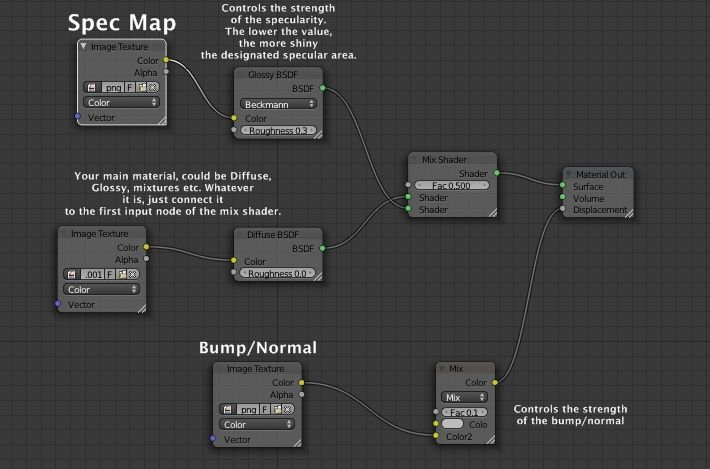
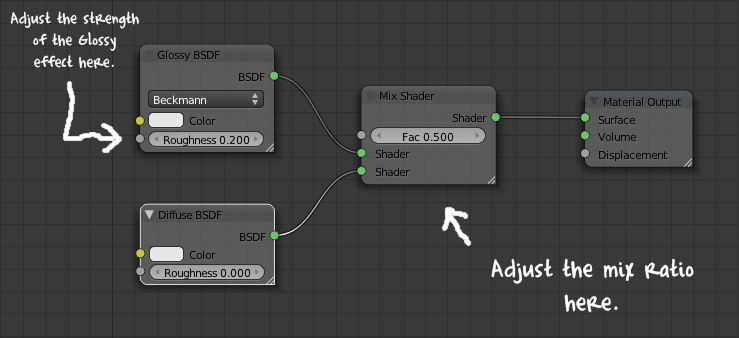
Here is the node setup for mixing shader:
NOTES:
i) The Fac value in the Mix Shader node controls the ratio of the mixture. For example you can see that in the picture above it is set at 0.500, which means the material will consists of 50% Diffuse, and 50% Glossy. If you set the value to 1.00 the material will consists of 100% Diffuse. If you set it to 0.00, it will consists of 100% Glossy. If you set it at 0.700 it will consists of 70% Diffuse and 30% Glossy... and so forth! Simple, right?
ii) The Roughness value in the Glossy node controls the shininess of the Glossy effect. The lower the value, the sharper the shine will become and vice versa.
iii) It is highly recommended to just leave the Roughness value in the Diffuse node as 0.00 so it will be easier for you to adjust and track the mixture.
iv) When adding the texture image for the material, be sure to connect the output to both the color input on the Glossy and Diffuse node.
And that's it! The rest is up to you! Feel free to mix the shaders and adjust the value to create any shader effects you need! For instance, if human skin you can increase the value of Glossy Roughness a bit, and increase the Fac value in Mix Shader to increase the ratio of Diffuse shader against Glossy. Give it a try, experiment and toy around with it ^^
Let me know if you have any questions, or if I've missed something that I should cover.
Next up, let's learn how to mix shaders using the Mix Shader node. This is an essential part, you can freely create various shader effects on your render. But first, let's introduce ourselves to two of the basic and commonly used shader in Cycles, the Diffuse shader and Glossy shader.
The diffuse shader is the base clay material shader in Cycles.
The Glossy shader is, well...Glossy (i have no other way to put it lol) it's shiny and reflective, just like alloy or silver, or that Terminator 2 cop guy when he melts into that thing and stuff.
And here is the Mixed shader, as a result of mixing both Diffuse and Glossy!
Here is the node setup for mixing shader:
NOTES:
i) The Fac value in the Mix Shader node controls the ratio of the mixture. For example you can see that in the picture above it is set at 0.500, which means the material will consists of 50% Diffuse, and 50% Glossy. If you set the value to 1.00 the material will consists of 100% Diffuse. If you set it to 0.00, it will consists of 100% Glossy. If you set it at 0.700 it will consists of 70% Diffuse and 30% Glossy... and so forth! Simple, right?
ii) The Roughness value in the Glossy node controls the shininess of the Glossy effect. The lower the value, the sharper the shine will become and vice versa.
iii) It is highly recommended to just leave the Roughness value in the Diffuse node as 0.00 so it will be easier for you to adjust and track the mixture.
iv) When adding the texture image for the material, be sure to connect the output to both the color input on the Glossy and Diffuse node.
And that's it! The rest is up to you!
Let me know if you have any questions, or if I've missed something that I should cover.