I have a model:
https://trolt.deviantart.com/art/Pyrrha ... -705895548
I am having trouble re-creating the eyes to be similar to something like Pyrrha Omega in the screen shots
https://www.fightersgeneration.com/nx/g ... omega2.png
http://4.bp.blogspot.com/-z--nSBBElZk/T ... V_0016.jpg
https://i.pinimg.com/736x/f5/15/25/f515 ... anning.jpg
Specifically i'm describing that the pupil remains jet black while the iris has an intense luminescence.
I'm not familiar with other XPS models that would have similar eyes that I could download and learn from.
Currently I'm have the standard eyeball textures as a material + an additional group38 "emissions" material which IMO isn't satisfactory.
Would this require more tinkering with photoshop? Issues of transparency ? I'm not even sure where to begin (http://xnalara.forumotion.com/t225-lession-9) I've tried to apply
The same model has the "glowing" claw which is something that turned out really well (my opinion at least) but trying to do something similar for her eyes hasn't lead to anything fruitful.
Could anyone give me some pointers ?
Eye Emission - Suggestions Please
Moderators: ObscureMemories, Runa, Love2Raid
Eye Emission - Suggestions Please
Last edited by WuHT on Mon May 07, 2018 1:09 pm, edited 1 time in total.
---
I appreciate all help provided
I appreciate all help provided
Re: Eye Emission - Suggestions Please
ÔÇ£Imagination is everything. ItÔÇÖs the preview of lifeÔÇÖs coming attractions.ÔÇØ
ÔÇö ALBERT EINSTEIN ÔÇö
I am not sure if I understand your question correctly. I use the Microsoft/BING translator.
You will find a lot of tutorials about "Creating Emissive map, Glow in the Dark Textures" on CGTalk, CGSociety, Polycount ...
Especially in the Polycount forum, you can find some posts from the person who has created the model "Pyrrha Omega". Since you intend to modify his model, I am sure you have already contacted him.
Its important to always find great reference for your work in general, but in the areas of glows and lens fx this is even more imperative, the differences are miles apart.
A Brief Considerations About Materials: http://www.manufato.com/?p=902
Other XPS models that have similar eyes to learn from, are available on Deviantart. By SSPD077, daventrychris, AtlantiB ...
A tutorial is there https://padme4000.deviantart.com/art/Ad ... -458523787
The emmisive map is a texture that receives no lighting, so the pixels are shown at full intensity. Also called a Fullbright Map, Glow Map, Incandescence Map, or Self-Illumination Map. This is used for a glow in the dark effect, but does not emit light onto adjacent surfaces. No matter if you change the light colors, either you turn all lights OFF, the emissive map are shown always in the same brightness and with the same colors.
The shader code is there http://www.tombraiderforums.com/showpos ... ostcount=8
You have decided to use group 38. I am not sure if this was a random choice or what reasons you had to choose this RG..
Basically, XPS has 4 different ways to create a glow:
1) The most stunning effect is "Thor's Glow"
https://iamalbertwesker.deviantart.com/ ... -199256329
https://sta.sh/03ubyzrgy39
Or more precisely "thorglowgauntletleft" and "thorglowgauntletright".
This is the only one, what do not use a surface shader. So this effect can produce a surrounding glow. The bone joints "unused072" and "unused097" defines where the illumination should be displayed, and the alpha mask data\common\glow.png defines the light diameter and light attenuation. The color of the glow can be adjust on the GUI with "Options->Display accessories->Thor's gear glow->Glow left/right color ..."
2) "thorbelt1" and "thorbelt2".
This is a surface shader, in essence, it use the texture as mask.
3) RG 21
This surface shader apply the emmisive map into the diffuse slot and do not use any color map.
4) RG 31, 36/37, 38/39
This surface shader add the emmisive map colors to the diffuse map colors. The alpha channels (diffuse and emission) are also added together! -- Your "Issues of transparency" ?
So you have decided to use group 38. This means you have already made a design decision for the desired effect. You use a diffuse (color) map, which react to the light settings, AND you add a texture which ignore the light settings. True, a Emission map can be used alongside a Diffuse map to add a glow effect, such as magic runes on a sword or the heated material on a torch. Usually a Emission map is a grayscale image. 0% grey (black) is neutral (0% extra illumination, so you are essentially left with your diffuse map). Brighter will be more luminous. Any areas that aren't black on your texture will glow. Lighting (color and intensity) not have any effect on the emissive areas. So if you have used the standard eyeball textures as a diffuse texture + an additional "emissions" image, using group38, then this emissions map should be a grayscale image. -- Or did you duplicate the eyeball geometry? One with RG 38 and the other with another RG ??
BTW, Rg 38 do not support transparency, so I do not understand your "Issues of transparency".
If you want a Glow in the Dark Texture, then I would attach the standard eyeball textures as Emission map, and a black image as diffuse map (Or use group 21 ). Now the eyes has always the same color and brightness, independent of the light settings.
If the eyes should appear brighter when the light source is raised, then convert the eyeball texture with photoshop to grayscale and attach this image as diffuse map.
Remark by Conversion to grayscale to account the human perception. WeÔÇÖre more sensitive to green than other colors, so green is weighted most heavily. The formula for luminosity is
Gray = 0.21 R + 0.72 G + 0.07 B -> https://www.johndcook.com/blog/2009/08/ ... grayscale/
Another formula is
Gray = color.r / 3.2 + color.g / 1.7 + color.b / 9.3 -> code from "user written shader" called "XL GrayScale.fx"
or
Gray = 0.299×Red + 0.587×Green + 0.114×Blue. -> http://entropymine.com/imageworsener/grayscale/
or
Gray = (Red * 0.3 + Green * 0.59 + Blue * 0.11)
 See also http://www.tannerhelland.com/3643/grays ... rithm-vb6/
Instead of treating red, green, and blue light equally, a good grayscale conversion will weight each color based on how the human eye perceives it.
ÔÇö ALBERT EINSTEIN ÔÇö
I am not sure if I understand your question correctly. I use the Microsoft/BING translator.
You will find a lot of tutorials about "Creating Emissive map, Glow in the Dark Textures" on CGTalk, CGSociety, Polycount ...
Especially in the Polycount forum, you can find some posts from the person who has created the model "Pyrrha Omega". Since you intend to modify his model, I am sure you have already contacted him.
Its important to always find great reference for your work in general, but in the areas of glows and lens fx this is even more imperative, the differences are miles apart.
A Brief Considerations About Materials: http://www.manufato.com/?p=902
Other XPS models that have similar eyes to learn from, are available on Deviantart. By SSPD077, daventrychris, AtlantiB ...
A tutorial is there https://padme4000.deviantart.com/art/Ad ... -458523787
The emmisive map is a texture that receives no lighting, so the pixels are shown at full intensity. Also called a Fullbright Map, Glow Map, Incandescence Map, or Self-Illumination Map. This is used for a glow in the dark effect, but does not emit light onto adjacent surfaces. No matter if you change the light colors, either you turn all lights OFF, the emissive map are shown always in the same brightness and with the same colors.
The shader code is there http://www.tombraiderforums.com/showpos ... ostcount=8
You have decided to use group 38. I am not sure if this was a random choice or what reasons you had to choose this RG..
Basically, XPS has 4 different ways to create a glow:
1) The most stunning effect is "Thor's Glow"
https://iamalbertwesker.deviantart.com/ ... -199256329
https://sta.sh/03ubyzrgy39
Or more precisely "thorglowgauntletleft" and "thorglowgauntletright".
This is the only one, what do not use a surface shader. So this effect can produce a surrounding glow. The bone joints "unused072" and "unused097" defines where the illumination should be displayed, and the alpha mask data\common\glow.png defines the light diameter and light attenuation. The color of the glow can be adjust on the GUI with "Options->Display accessories->Thor's gear glow->Glow left/right color ..."
2) "thorbelt1" and "thorbelt2".
This is a surface shader, in essence, it use the texture as mask.
3) RG 21
This surface shader apply the emmisive map into the diffuse slot and do not use any color map.
4) RG 31, 36/37, 38/39
This surface shader add the emmisive map colors to the diffuse map colors. The alpha channels (diffuse and emission) are also added together! -- Your "Issues of transparency" ?
So you have decided to use group 38. This means you have already made a design decision for the desired effect. You use a diffuse (color) map, which react to the light settings, AND you add a texture which ignore the light settings. True, a Emission map can be used alongside a Diffuse map to add a glow effect, such as magic runes on a sword or the heated material on a torch. Usually a Emission map is a grayscale image. 0% grey (black) is neutral (0% extra illumination, so you are essentially left with your diffuse map). Brighter will be more luminous. Any areas that aren't black on your texture will glow. Lighting (color and intensity) not have any effect on the emissive areas. So if you have used the standard eyeball textures as a diffuse texture + an additional "emissions" image, using group38, then this emissions map should be a grayscale image. -- Or did you duplicate the eyeball geometry? One with RG 38 and the other with another RG ??
BTW, Rg 38 do not support transparency, so I do not understand your "Issues of transparency".
If you want a Glow in the Dark Texture, then I would attach the standard eyeball textures as Emission map, and a black image as diffuse map (Or use group 21
If the eyes should appear brighter when the light source is raised, then convert the eyeball texture with photoshop to grayscale and attach this image as diffuse map.
Remark by Conversion to grayscale to account the human perception. WeÔÇÖre more sensitive to green than other colors, so green is weighted most heavily. The formula for luminosity is
Gray = 0.21 R + 0.72 G + 0.07 B -> https://www.johndcook.com/blog/2009/08/ ... grayscale/
Another formula is
Gray = color.r / 3.2 + color.g / 1.7 + color.b / 9.3 -> code from "user written shader" called "XL GrayScale.fx"
or
Gray = 0.299×Red + 0.587×Green + 0.114×Blue. -> http://entropymine.com/imageworsener/grayscale/
or
Gray = (Red * 0.3 + Green * 0.59 + Blue * 0.11)
Instead of treating red, green, and blue light equally, a good grayscale conversion will weight each color based on how the human eye perceives it.
Re: Eye Emission - Suggestions Please
Wow. I appreciate the big response as it appears it must have taken you a lot of time to type out.Anx wrote: I am not sure if I understand your question correctly. I use the Microsoft/BING translator.
I don't see anyone in the polycount forum with this particular model.Especially in the Polycount forum, you can find some posts from the person who has created the model "Pyrrha Omega". Since you intend to modify his model, I am sure you have already contacted him.
On my end, when I was porting I feel I don't have the eyes done to a satisfactory level.
Cool i'll dig through their stuff.Other XPS models that have similar eyes to learn from, are available on Deviantart. By SSPD077, daventrychris, AtlantiB ...
A tutorial is there https://padme4000.deviantart.com/art/Ad ... -458523787
It was random.. because i thought it was the appropriate group at the time lol. As you have predicted, I have essentially just went through a trial-and-error stage.You have decided to use group 38. I am not sure if this was a random choice or what reasons you had to choose this RG..
I suspect that the in-game screen shots will always be different from what XPS will show. The glow/emission effect I'm seeing maybe is in-game only. I mean maybe someone can provide a better judgement call than me regarding the screenshots and if I'm on the wrong path
http://videoclipsimage.agaclip.com/aga/ ... ugh-pa.png
http://i.imgur.com/VGCZDu4.jpg
https://orig00.deviantart.net/24ff/f/20 ... 4qp8ne.jpg
---
I appreciate all help provided
I appreciate all help provided
Re: Eye Emission - Suggestions Please
Thanks for making the answer in short phrases. This facilitates the translation. 
Right, it took a long time to comment. Especially because I had to write everything twice. It took so much time that I got a timeout from the forum. Before I submit my text, I press the preview button. The forum has ask me for my password. And then my text was gone. Lexion learned.
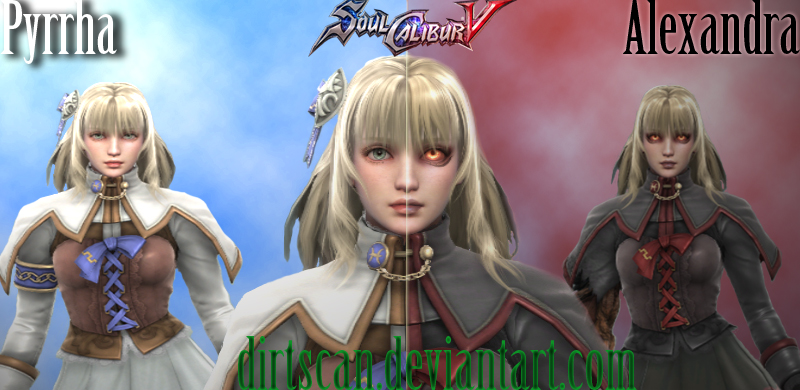
The DeviantArt image https://dirtscan.deviantart.com/art/Pyr ... -286712330 was very interesting.
Her evil side is a surface shader. No BLOOM, no surroundig glow.
There are 3 ways to create this effect. At least.
1) A different diffuse map. The simplest variant. ThatÔÇÖs is was this Pyrrha Omega XPS port makes (I dislike the white specular map  ).
).
2) Using a specular map. The shine will changes with the angle of lightxcamera. In the dark, the shine is diminished.
3) Using a emmision (glow) map. The shine will not changes with the angle of lightxcamera. In the dark, the shine is unchanged bright.
I'm not sure, but I suspect it was used an emission map.
If you have read "A Brief Considerations About Materials": http://www.manufato.com/?p=902 (highly recommended) both maps (specular map and glow map) are simply ADDED to the diffuse (as a simple mathematical addition).
Photoshop Blend Modes Explained
So, I have made a simple test. I cut the "devil" face from the DeviantArt image; and I have assigned it as diffuse map to a simple plane in XPS.

-- Diffuse Map --
In PhotoShop, I have mirrored the evil pupil of the eye, as new layer under the normal eye.
Now I have chosen the blend mode "Subtract"
(So, color value difference between "Normal eye" and "Devil eye" -- And I have "Darken" the result slightly).
The result is a map, which can be used as specular or glow map.

-- Difference between "NormalEye and DevilEye". Can be used as Specular Map or as Emission Map --
Result in XPS:
In XPS "Material-Editor" as "Emission" (glow) map: (The specular map is black, so no specular effect at all)

-- Difference between "NormalEye and DevilEye" used as Emmision Map --
In XPS "Material-Editor" as "Specular" map: (Specular multiplier is very hight. Value 77)

-- Difference between "NormalEye and DevilEye" used as Specular Map --
Both results are very close to the original (on the right)
True, that the in-game screen shots will always be different from what XPS (or any other game engine) will show. Each model is made for a specific shader. On the other hand, the mathematics behind each texture type is the same. You will still need to adjust the "render Parameter" and the map brightness.
If you keep in mind that all specularity (specular and emmision) is simply ADDED to the diffuse (as a simple mathematical addition) we start understanding how this part of the render works and we have a little more control over it.
The great thing about it is that once you understand this you can have a solid starting point, instead of just guessing what color you should use. And that saves a lot of time
In summary:
If
"Normal-Render" + Glow/Specular-Map = "Evil-Render-Result"
then
"Evil-Render-Result" - "Normal-Render" = "Glow/Specular-Map"
ThatÔÇÖs it!
I hope you find this useful!
Read more: http://www.manufato.com/?p=902
Right, it took a long time to comment. Especially because I had to write everything twice. It took so much time that I got a timeout from the forum.
The DeviantArt image https://dirtscan.deviantart.com/art/Pyr ... -286712330 was very interesting.
Her evil side is a surface shader. No BLOOM, no surroundig glow.
There are 3 ways to create this effect. At least.
1) A different diffuse map.
2) Using a specular map.
3) Using a emmision (glow) map.
I'm not sure, but I suspect it was used an emission map.
If you have read "A Brief Considerations About Materials": http://www.manufato.com/?p=902 (highly recommended)
Photoshop Blend Modes Explained
So, I have made a simple test. I cut the "devil" face from the DeviantArt image; and I have assigned it as diffuse map to a simple plane in XPS.
-- Diffuse Map --
In PhotoShop, I have mirrored the evil pupil of the eye, as new layer under the normal eye.
Now I have chosen the blend mode "Subtract"
(So, color value difference between "Normal eye" and "Devil eye" -- And I have "Darken" the result slightly).
The result is a map, which can be used as specular or glow map.
-- Difference between "NormalEye and DevilEye". Can be used as Specular Map or as Emission Map --
Result in XPS:
In XPS "Material-Editor" as "Emission" (glow) map: (The specular map is black, so no specular effect at all)
-- Difference between "NormalEye and DevilEye" used as Emmision Map --
In XPS "Material-Editor" as "Specular" map: (Specular multiplier is very hight. Value 77)
-- Difference between "NormalEye and DevilEye" used as Specular Map --
Both results are very close to the original (on the right)
True, that the in-game screen shots will always be different from what XPS (or any other game engine) will show. Each model is made for a specific shader. On the other hand, the mathematics behind each texture type is the same. You will still need to adjust the "render Parameter" and the map brightness.
If you keep in mind that all specularity (specular and emmision) is simply ADDED to the diffuse (as a simple mathematical addition) we start understanding how this part of the render works and we have a little more control over it.
The great thing about it is that once you understand this you can have a solid starting point, instead of just guessing what color you should use. And that saves a lot of time
In summary:
If
"Normal-Render" + Glow/Specular-Map = "Evil-Render-Result"
then
"Evil-Render-Result" - "Normal-Render" = "Glow/Specular-Map"
ThatÔÇÖs it!
I hope you find this useful!
Re: Eye Emission - Suggestions Please
HUGE thanks Anx
https://imgur.com/a/quHiWsN
Seems to be the result, which is satisfactory in my eyes.
Thanks for "subtracting" the emission for me, so that I could have a good starting point to play with for my emission map.
https://imgur.com/a/quHiWsN
Seems to be the result, which is satisfactory in my eyes.
Thanks for "subtracting" the emission for me, so that I could have a good starting point to play with for my emission map.
---
I appreciate all help provided
I appreciate all help provided
Re: Eye Emission - Suggestions Please
n.p. It was a pleasure to accompany you through this process.
The result looks stunning. Thx for your credits on DA. Very appreciated 
I try to summarize the content of this thread.
1)
At first, it was in your mind, to create the glow using a diffuse_map + alpha_mask = glow_effect

+

=

Right, this works. But it is not how RG 38 works.
This effect in XNALara_XPS is called "Thor's Glow", or more precisely "thorglowgauntletleft" and "thorglowgauntletright".
So, the name for the "eyes" mesh must be just (exactly) "thorglowgauntletleft"; and not "38_eyes"
The glow appears, using "Options->Display accessories->Thor's gear glow->Gauntlet left/right"
Nine years ago, the TRF user "not again!" has used this effect for her MOD Allegories

Another XPS model by "not again!" that you can download and learn from, is Lilith Human. "thorglowgauntletleft" and "thorglowgauntletright" is the necklace.

A similary effect can be produced using the surface shader (model alpha mask texture) "thorbelt1" or "thorbelt2". The model to learn from is lara_jungle_shorts made by Dusan.
2)
Definitively, you have decided to create the glow using a diffuse_map + a emission_map = glow_effect
This is how "Render Group Number" 38 works.

+

=


daylight vs darkness
The model to learn from is now PyrrhaOmega.SC5.1P
The result looks stunning.
I try to summarize the content of this thread.
1)
At first, it was in your mind, to create the glow using a diffuse_map + alpha_mask = glow_effect
+
=
Right, this works. But it is not how RG 38 works.
This effect in XNALara_XPS is called "Thor's Glow", or more precisely "thorglowgauntletleft" and "thorglowgauntletright".
So, the name for the "eyes" mesh must be just (exactly) "thorglowgauntletleft"; and not "38_eyes"
The glow appears, using "Options->Display accessories->Thor's gear glow->Gauntlet left/right"
Nine years ago, the TRF user "not again!" has used this effect for her MOD Allegories
Another XPS model by "not again!" that you can download and learn from, is Lilith Human. "thorglowgauntletleft" and "thorglowgauntletright" is the necklace.
A similary effect can be produced using the surface shader (model alpha mask texture) "thorbelt1" or "thorbelt2". The model to learn from is lara_jungle_shorts made by Dusan.
2)
Definitively, you have decided to create the glow using a diffuse_map + a emission_map = glow_effect
This is how "Render Group Number" 38 works.
+
=
daylight vs darkness
The model to learn from is now PyrrhaOmega.SC5.1P